Sometimes, I am too lazy to get up and turn my server/desktop on, when I am using my laptop. So I decided to enable Wake-On-Lan. The network adapter in my desktop will remain on and listen for a Wake-On-Lan Packet. When it receives that packet the machine will turn on. I remember back in the old days you just had to make one change in the bios to enable WOL, but now you need to make a few changes in windows 7/Server 2008 R2 in order to enable it.
There are many different BIOS’ and NICs, so unless you have the same motherboard as me, the changes you will need to make will probably be slightly different, but the process should be the same.
So first stop, the BIOS.
To get to the setup screen, we need to see the BIOS Post screen. BIOS’ now mostly show a large Logo screen. You can usually see the Post screen by hitting tab or esc, it will depend on you specific Motherboard/BIOS, but it should say on the screen. Once you see the Post screen (like below), it should tell you how to get to the setup. My motherboard is a ASUS P5Q Pro and they use Del to enter the BIOS setup.

After hitting Delete, it will push me to the setup. I have seen other BIOS’ use ESC, F1, F2, F8, F12, Tab so you should double check to see what it says there to enter the Setup or Config.
Be careful in the BIOS as misconfiguration could screw some things up. We want to look for Wake On Lan or NIC configuration. It’s usually in the advanced tab under peripherals, however mine looks like it is under Power -> APM Configuration.
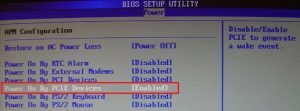
My NIC is a PCIE Device, so I need to Enable “Power On By PCIE Devices”. There are other options here you could enable, like if you wanted to turn your computer on via keystroke, but I don’t really need that. So after enabling that, be sure to go to the Save menu and hit Save and Exit Configuration/Settings.
Now the computer should reboot. Once it boots into windows, click start and type “Network and Sharing Center” and hit enter. Click Change adapter settings on the left. Right Click on your network adapter and click Properties. Click the Configure button. Click the Advanced Tab. The next two changes will depend on your Network Adapter, chances are they will be called different things, but you will want to look for something similar:
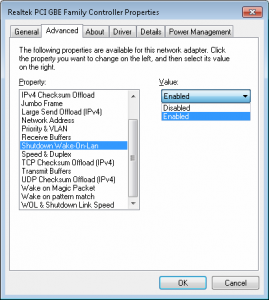
Find “Shutdown Wake-On-Lan” and enable it.
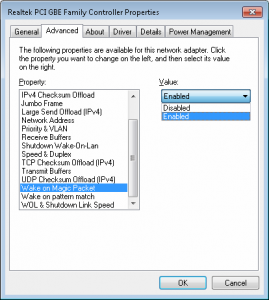
Next, find Wake on Magic Packet and select Enable. A different NIC in my computer had this listed as “Wake up Capabilities”, then select Magic Packet. So it might be a little guess work depending on your NIC.
Now, Wake On Lan should be enabled. To test it out or use it, Shutdown your computer. From a different computer, in my example my laptop, install a Wake On Lan program like http://magicpacket.free.fr/ its small and simple. Next, type in the settings for your computer:
Host Name: either the computer name or IP
Subnet Mask: 0.0.0.0 (Network Broadcast) should work fine, unless your have your network setup all fancy, in which case you probably don’t need this guide.
MAC Address: Assuming you have a router on your network, you should be able to grab the mac address in the same location as the DHCP information. It should be about 12 characters long not including hyphens and something look like AA-AA-AA-AA-AA-AA
Protocol: UDP
Port: 9
Click send, and your computer should fire on.
Thank you for the guide. Worked like a charm 🙂